- Published on
React Native Performance Optimization within a List
- Authors

- Name
- Güven Karanfil
- @guven_karanfil
React native performance optimization is a key aspect of any application. So, we will explore a case of poor performance in a list and discuss how to address this issue. This includes implementing memoization and testing performance in a fast feedback loop.
Most apps frequently need to display a list of items. In React Native, we typically use FlatList or ScrollView for this purpose. However, have you ever considered how efficiently your list operates?
In this article, I will explore a case of poor performance in a list and discuss how to address this issue. This includes implementing memoization and testing performance in a fast feedback loop.
Learning Outcomes
Identification of a Performance Bottleneck: We successfully pinpointed a critical performance issue where list items were being re-rendered unnecessarily. This identification is a vital step towards optimizing the application’s efficiency and user experience.
Validation of the Issue Through Testing: By implementing a test, we not only confirmed the existence of the issue but also quantified its impact. This objective evidence is crucial for justifying the need for code refactoring.
Facilitating Targeted Refactoring: With a clear understanding of the problem, we can now proceed with refactoring the code more effectively. This approach ensures that our efforts are directly addressing the identified performance bottleneck.
Performance Monitoring: Ensuring render time and count of a component while project evolves with reassure
Ensuring Resolution and Maintaining Quality: Post-refactoring, we can use the same testing approach to verify that the issue has been resolved. This not only assures the effectiveness of our solution but also helps maintain the overall quality and performance of the application as it evolves.
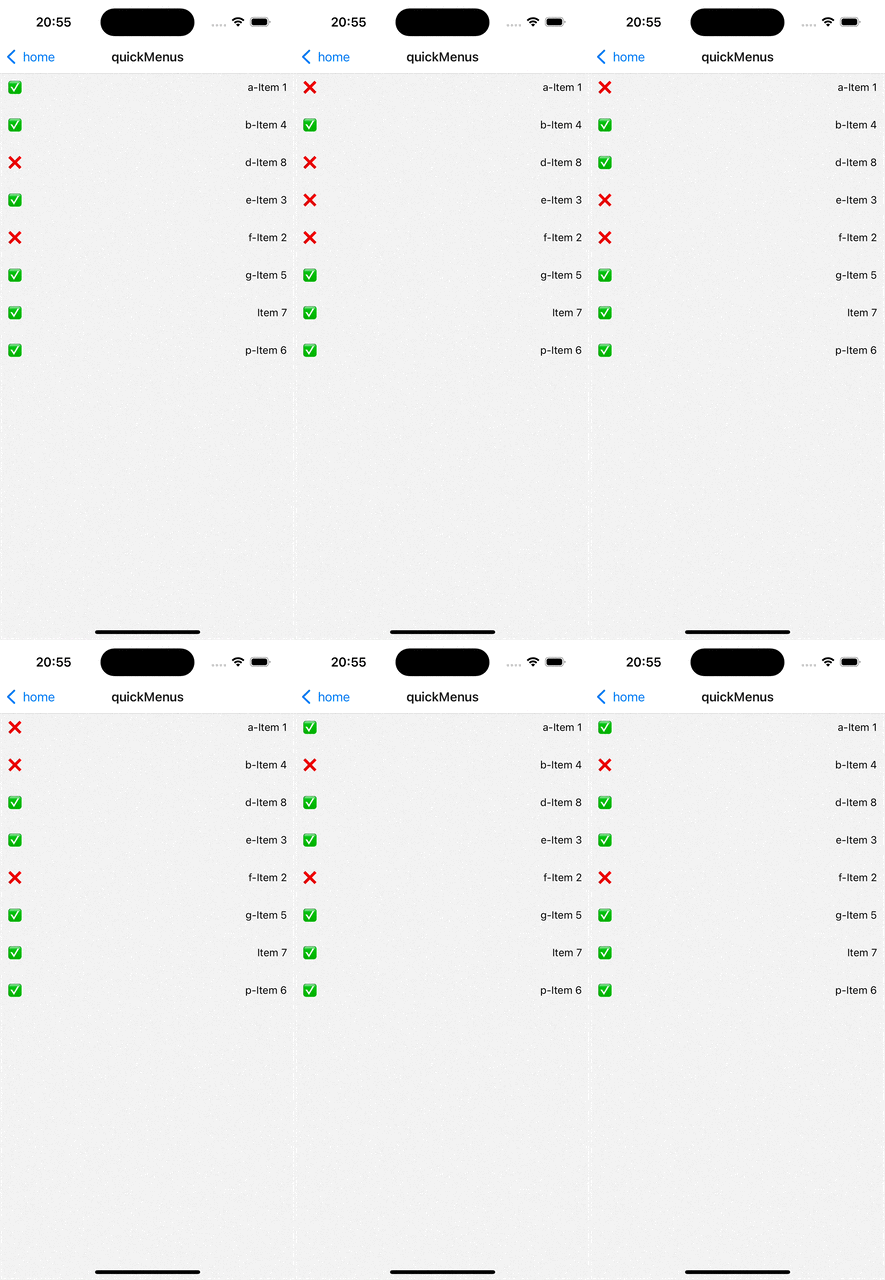
As gift shows, we have a list of items that we can press on an item to mark it as done, and click again to revert it to not done. Code is very simple as well. We have two main component to achieve this. MenuEdit and MenuEditItem Let’s how these component code looks like
MenuEdit.tsx
    import React, {useState} from 'react';
    import {FlatList} from 'react-native';
    import MenuEditItem from './MenuEditItem';

    export interface IMenuItem {
      id: string;
      name: string;
      isActive: boolean;
    }

    interface IMenuEditProps {
      menus?: IMenuItem[];
    }

    export default function MenuEdit({menus}: IMenuEditProps) {
      const _sortedMenus = menus?.sort((a, b) => a.name.localeCompare(b.name));
      const [sortedMenus, setsortedMenus] = useState(_sortedMenus);

      const checkItem = (item: IMenuItem, status: boolean) => {
        const updatedMenus = sortedMenus?.map(menu => {
          if (menu.id === item.id) {
            return {
              ...menu,
              isActive: status,
            };
          }
          return menu;
        });
        setsortedMenus(updatedMenus);
      };

      if (sortedMenus && sortedMenus.length > 0) {
        return (
          <FlatList
            data={sortedMenus}
            renderItem={({item}) => (
              <MenuEditItem item={item} onPress={checkItem} />
            )}
          />
        );
      }

      return null;
    }
MenuEditItem.tsx
    import {Pressable, StyleSheet, Text, View} from 'react-native';
    import React from 'react';
    import {IMenuItem} from '.';

    interface IMenuEditItemProps {
      item: IMenuItem;
      onPress: (item: IMenuItem, status: boolean) => void;
    }

    const CheckBox = ({isActive, id}: {isActive: boolean; id: string}) => {
      return (
        <View
          testID={(isActive ? 'checked' : 'unChecked') + '-' + id}
          style={styles.checkboxContainer}>
          <Text>{isActive ? '✅' : '❌'}</Text>
        </View>
      );
    };

    export default function MenuEditItem({item, onPress}: IMenuEditItemProps) {
      return (
        <Pressable testID={item.id} onPress={() => onPress(item, !item.isActive)}>
          <View style={styles.container}>
            <CheckBox id={item.id} isActive={item.isActive} />
            <Text style={styles.label}>{item.name}</Text>
          </View>
        </Pressable>
      );
    }

    const styles = StyleSheet.create({
      container: {
        flexDirection: 'row',
        justifyContent: 'space-between',
        padding: 10,
      },
      label: {
        fontSize: 14,
        fontWeight: '400',
        color: '#000',
      },
      checkboxContainer: {
        width: 30,
        height: 30,
      },
      checkedBoxBackground: {
        backgroundColor: '#fff',
      },
      unCheckedBoxBackground: {
        backgroundColor: '#000',
      },
    });
Additionaly you can see the Test-Driven development commit-by-commit *here*
Let’s delve into the rendering problem by adding logs to the MenuEditItem component, right before the return statement. This will help us understand how many times the component is rendering when we mark items as done or undo them.
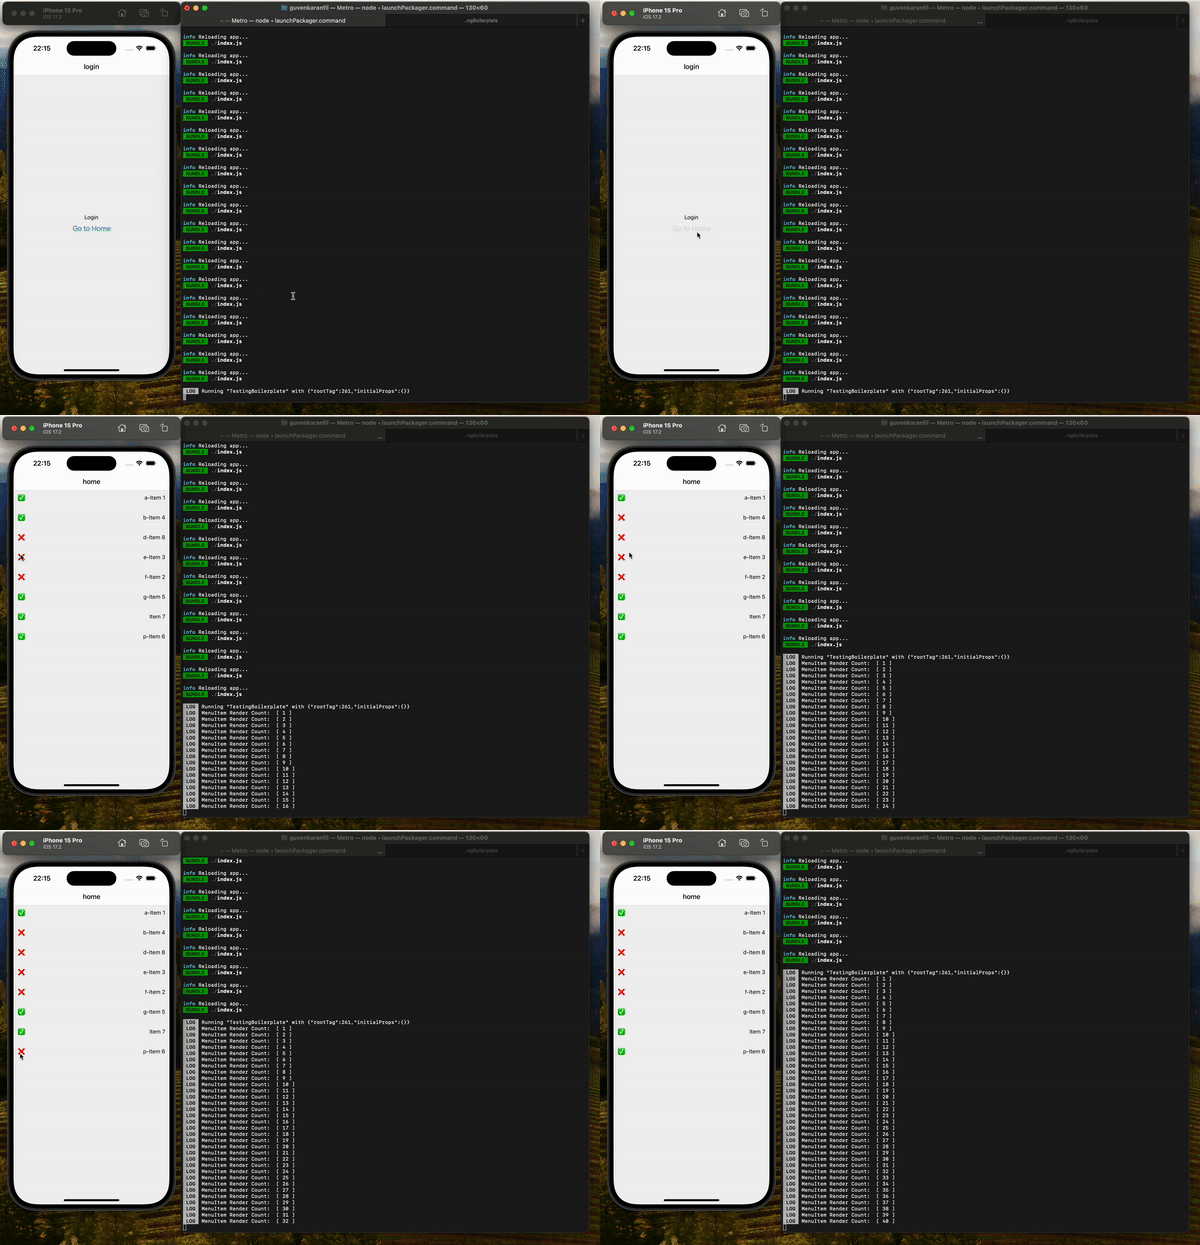 For better quality see video here
After adding a log to track the render count, the gif shows that whenever an item is pressed, all items in the list are rendered again. Let’s consider whether this is really necessary.
The answer is NO. React doesn’t actually need to re-render all the components in the list every time an item is pressed. So, what can we do to prevent unnecessary re-rendering?
The short answer is to memoize the component and its props where necessary. For example, in our case, the onPress prop should be memoized to avoid unnecessary re-rendering of the component.
Indeed, the most crucial aspect is to ensure your solution remains effective even as you continue development. You might feel confident after clicking the items and checking the logs, thinking the problem is solved. Then, you move on to other development tasks. But how can you be certain that your new changes haven’t disrupted the implementation you perfected earlier?
You might think of revisiting the logs each time. However, constantly adding something new, returning to the simulator or device, performing some actions, and then checking the logs can be incredibly time-consuming, right?
Absolutely, writing a test that continuously monitors for issues as you work on other requirements is a smart strategy. This approach doesn’t just save time; it also provides assurance that you haven’t inadvertently caused any problems before merging your branch. Proactive monitoring and testing are key for efficient and reliable development. Most importantly, this method offers fast feedback, allowing you to verify changes quickly during the development process.
To able to measure rendered time or count we can use a component called Profiler from react. But since we only care about the count we simply pass a prop called onRenderItemCallbak and expect the call count on test. Simply pass it as props for both components above. If you are with me so far let’s jump into the testing!
      test('should not list render item re-render unncessarily', async () => {
        const spyOnRenderItemCallback = jest.fn();
        render(
          <MenuEdit
            menus={MOCK_MENU_ITEMS}
            onRenderItemCallback={spyOnRenderItemCallback}
          />,
        );
        const totalListItem = MOCK_MENU_ITEMS.length;
        expect(spyOnRenderItemCallback).toHaveBeenCalledTimes(totalListItem + 1);
      });
The most important part of this test is spyOnRenderItemCallback It will enable to understand how many times is MenuEditItem component will be rendered.
expect(spyOnRenderItemCallback).toHaveBeenCalledTimes(totalListItem);
Additionally, observe the modification above. Rather than directly checking totalListItem, we increment it by one. This is because we update the menus using the Redux store. In a practical scenario, this update would typically occur at a higher level, such as when fetching real data from a service. With that in mind, let's now turn our attention to the output.
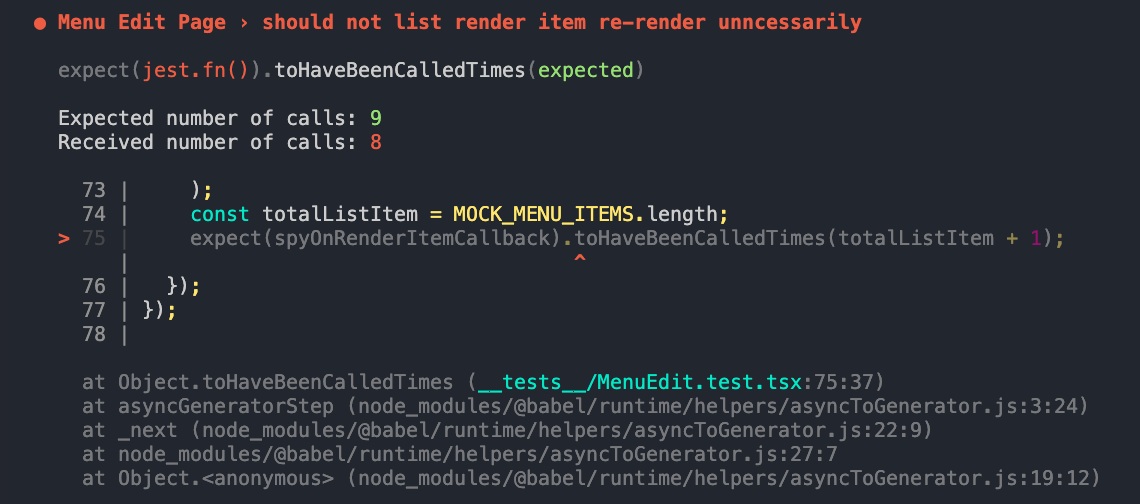 MenuEdit render count test result
We observed that the number of calls received is 8, which aligns with our expectations, as we haven’t implemented the solution yet. Now let’s proceed to update items on list within test. Update the test to
    const spyOnRenderItemCallback = jest.fn();
        const uncheckedItem1 = MOCK_MENU_ITEMS.filter(
          listItem => !listItem.isActive,
        )[0];
        const uncheckedItem2 = MOCK_MENU_ITEMS.filter(
          listItem => !listItem.isActive,
        )[1];

        const totalListItem = MOCK_MENU_ITEMS.length;

        render(
          <MenuEdit
            menus={MOCK_MENU_ITEMS}
            onRenderItemCallback={spyOnRenderItemCallback}
          />,
        );
        expect(spyOnRenderItemCallback).toHaveBeenCalledTimes(totalListItem);

        const unCheckedItems = screen.queryAllByText(unCheckItemLabel);
        await MenuEditTestHelpers.checkItem(uncheckedItem1);
        await MenuEditTestHelpers.checkItem(uncheckedItem2);

        expect(screen.queryAllByText(unCheckItemLabel).length).toEqual(
          unCheckedItems.length - 2,
        );

        expect(spyOnRenderItemCallback).toHaveBeenCalledTimes(totalListItem + 3);
      });
After rendering we find the unchecked items and mark them as done. You can find the details and helper functions **here. **Now let’s run the tests and observe the output.
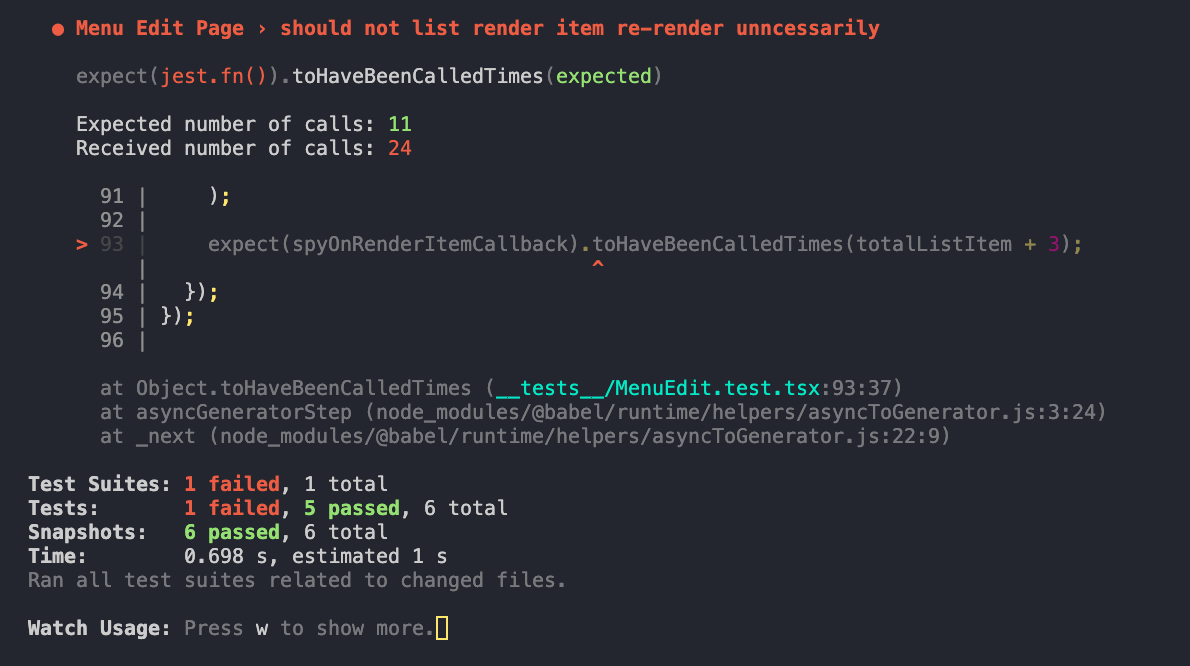 Test with press actions
We anticipated the rendered count to be 11, accounting for the list length, store update, and two item updates. However, we observed a count of 24 instead. This higher count is due to the initial rendering occurring 8 times, followed by a single update. It’s important to remember that updating just once can cause the entire list to re-render. Lastly, when we update one item again, it triggers re-rendering for each item in the list, leading to the total count being the product of the list length and the number of updates. This explains why the rendered count reached 24. Now let memoize the components!
First, we will modify the MenuEditItem component to only receive id and onRenderItemCallback as props. Let's go ahead and update this component.
    import React from 'react';
    import {Pressable, StyleSheet, Text, View} from 'react-native';
    import {useAppDispatch, useAppSelector} from '../../store';
    import {checkMenuItem} from '../../store/userSlice';

    interface IMenuEditItemProps {
      id: string;
      onRenderItemCallback?: () => void;
    }

    const CheckBox = ({isActive, id}: {isActive: boolean; id: string}) => {
      return (
        <View
          testID={(isActive ? 'checked' : 'unChecked') + '-' + id}
          style={styles.checkboxContainer}>
          <Text>{isActive ? '✅' : '❌'}</Text>
        </View>
      );
    };

    function MenuEditItem({id, onRenderItemCallback}: IMenuEditItemProps) {
      if (process.env.NODE_ENV === 'test') {
        onRenderItemCallback?.();
      }

      const dispatch = useAppDispatch();
      const item = useAppSelector(state =>
        state.user.menus?.find(menuItem => menuItem.id === id),
      );

      const onPressItem = () => {
        dispatch(checkMenuItem({id: id, status: !item!.isActive}));
      };

      if (!item) {
        return null;
      }

      return (
        <Pressable testID={id} onPress={onPressItem}>
          <View style={styles.container}>
            <CheckBox id={id} isActive={item.isActive} />
            <Text style={styles.label}>{item.name}</Text>
          </View>
        </Pressable>
      );
    }

    const styles = StyleSheet.create({
      container: {
        flexDirection: 'row',
        justifyContent: 'space-between',
        padding: 10,
      },
      label: {
        fontSize: 14,
        fontWeight: '400',
        color: '#000',
      },
      checkboxContainer: {
        width: 30,
        height: 30,
      },
      checkedBoxBackground: {
        backgroundColor: '#fff',
      },
      unCheckedBoxBackground: {
        backgroundColor: '#000',
      },
    });

    export default React.memo(MenuEditItem);
We have now revised the interface and are accessing items appropriately, implementing memoization in the MenuEditItem component. Next, we should update the MenuEdit file to reflect these changes and ensure consistency across the components.
    import React, {useEffect} from 'react';
    import {FlatList} from 'react-native';
    import MenuEditItem from './MenuEditItem';
    import {MOCK_MENU_ITEMS} from '../../../__mocks__';
    import {useAppDispatch} from '../../store';
    import {setMenus} from '../../store/userSlice';

    export interface IMenuItem {
      id: string;
      name: string;
      isActive: boolean;
    }

    interface IMenuEditProps {
      menus?: IMenuItem[];
      onRenderItemCallback?: () => void;
    }

    export default function MenuEdit({
      menus = MOCK_MENU_ITEMS,
      onRenderItemCallback,
    }: IMenuEditProps) {
      const dispatch = useAppDispatch();
      const sortedMenus = [...menus]?.sort((a, b) => a.name.localeCompare(b.name));

      useEffect(() => {
        dispatch(setMenus(sortedMenus));
      }, [dispatch, sortedMenus]);

      if (sortedMenus && sortedMenus.length > 0) {
        return (
          <FlatList
            data={sortedMenus}
            renderItem={({item}) => (
              <MenuEditItem
                id={item.id}
                onRenderItemCallback={onRenderItemCallback}
              />
            )}
          />
        );
      }

      return null;
    }
We’ve successfully updated the MenuEdit component to handle dispatching the menus data and correctly passing props to MenuEditItem. If you run the tests again, you'll notice that they are passing now. Fantastic, isn't it? This demonstrates the effectiveness of our updates and the power of proper memoization.
Once again you can see the evolution of the tests and component **here**
Measure Performance of a component with Reassure
Reassure, developed by Callstack, is a tool designed for measuring the performance of a component in React and React Native applications. It provides valuable information such as the time taken and the number of times a component has rendered. This tool is particularly useful for identifying performance bottlenecks and ensuring efficient rendering behavior in your applications. Let me put the The Problem and The Solution details from documentation.
The Problem “You want your React Native app to perform well and fast at all times. As a part of this goal, you profile the app, observe render patterns, apply memoization in the right places, etc. But it’s all manual and too easy to unintentionally introduce performance regressions that would only get caught during QA or worse, by your users.” The Solution Reassure allows you to automate React Native app performance regression testing on CI or a local machine. In the same way, you write your integration and unit tests that automatically verify that your app is still working correctly, you can write performance tests that verify that your app is still working performantly.
Before we delve deeper into the specifics, I recommend referring to the **documentation** for a more detailed exploration.
Install reassure as dev package and initizale it with **init **command
yarn add --dev reassure && yarn reassure init
It will create a folder called .perf-test.js under this folder we will add our test. For file name convention we followTEST_FILE_NAME.perf-test.tsx Go and create a file named MenuEdit.perf-test.tsx and put above test.
    import React from 'react';
    import {measurePerformance} from 'reassure';

    import MenuEdit from '../app/tabs/menuEdit';
    import AllProviders from '../.jest/helper/AllProviders';

    import {fireEvent, screen} from '@testing-library/react-native';
    import {MOCK_MENU_ITEMS} from '../__mocks__';

    test('MenuEdit Component Performance', async () => {
      const scenario = async (componentScreen: typeof screen) => {
        const checkedItem = MOCK_MENU_ITEMS.filter(item => item.isActive)[0];
        const checkedItemElement = componentScreen.getByTestId(checkedItem.id);

        await fireEvent.press(checkedItemElement);
      };

      await measurePerformance(<MenuEdit menus={MOCK_MENU_ITEMS} />, {
        scenario,
        wrapper: AllProviders,
      });
    });
Indeed, writing tests with Reassure is quite similar to using “react-native/testing-library”. The testing process primarily involves two main components:
The measurePerformance accept a scenario refers to the specific sequence of actions that you want Reassure to execute while measuring the performance of the component. For instance, your scenario might be to locate an unchecked item in a list and simulate a press action on it. This helps in understanding how the component behaves and performs under certain user interactions.
Scenario Execution: The scenario you define dictates the steps that Reassure will follow during the performance measurement. This approach allows for a targeted and specific assessment of the component’s performance, focusing on real-world use cases like user interactions and responses to state changes.
By leveraging these capabilities, you can gain valuable insights into the performance characteristics of your React Native components, especially in response to typical user actions.
The fundamental purpose of Reassure is to highlight performance differences between two distinct versions of code. What does this mean in practice? Consider a scenario where you develop a set of features for a page and consequently update the code. Reassure steps in to demonstrate the impact of these changes on performance.
In simpler terms, Reassure helps you to:
Compare Before and After: It allows you to measure and compare the performance of a component or a page before and after making changes or updates. This comparison is crucial for understanding how new features, optimizations, or code alterations affect the efficiency and speed of your application.
Identify Performance Impacts: By showing the performance differences, Reassure helps in pinpointing whether the changes made have improved, degraded, or maintained the same performance level. This insight is valuable in iterative development processes where continuous improvement is sought.
Make Informed Decisions: With the data provided by Reassure, developers can make more informed decisions about their coding practices, optimizations, and feature additions, ensuring that every update contributes positively to the overall performance of the application.
In essence, Reassure acts as a tool for performance monitoring, giving developers a clearer understanding of how their code modifications influence the application’s behavior and efficiency.
First we need to create baseline informations about test result to compare after. To create a baseline. Just run the reassure with — baseline flag.
yarn run reassure --baseline
After running the command reassure will create a file under .reassure folder called **baseline.perf **which it will used to compare changes with data inside current.perf
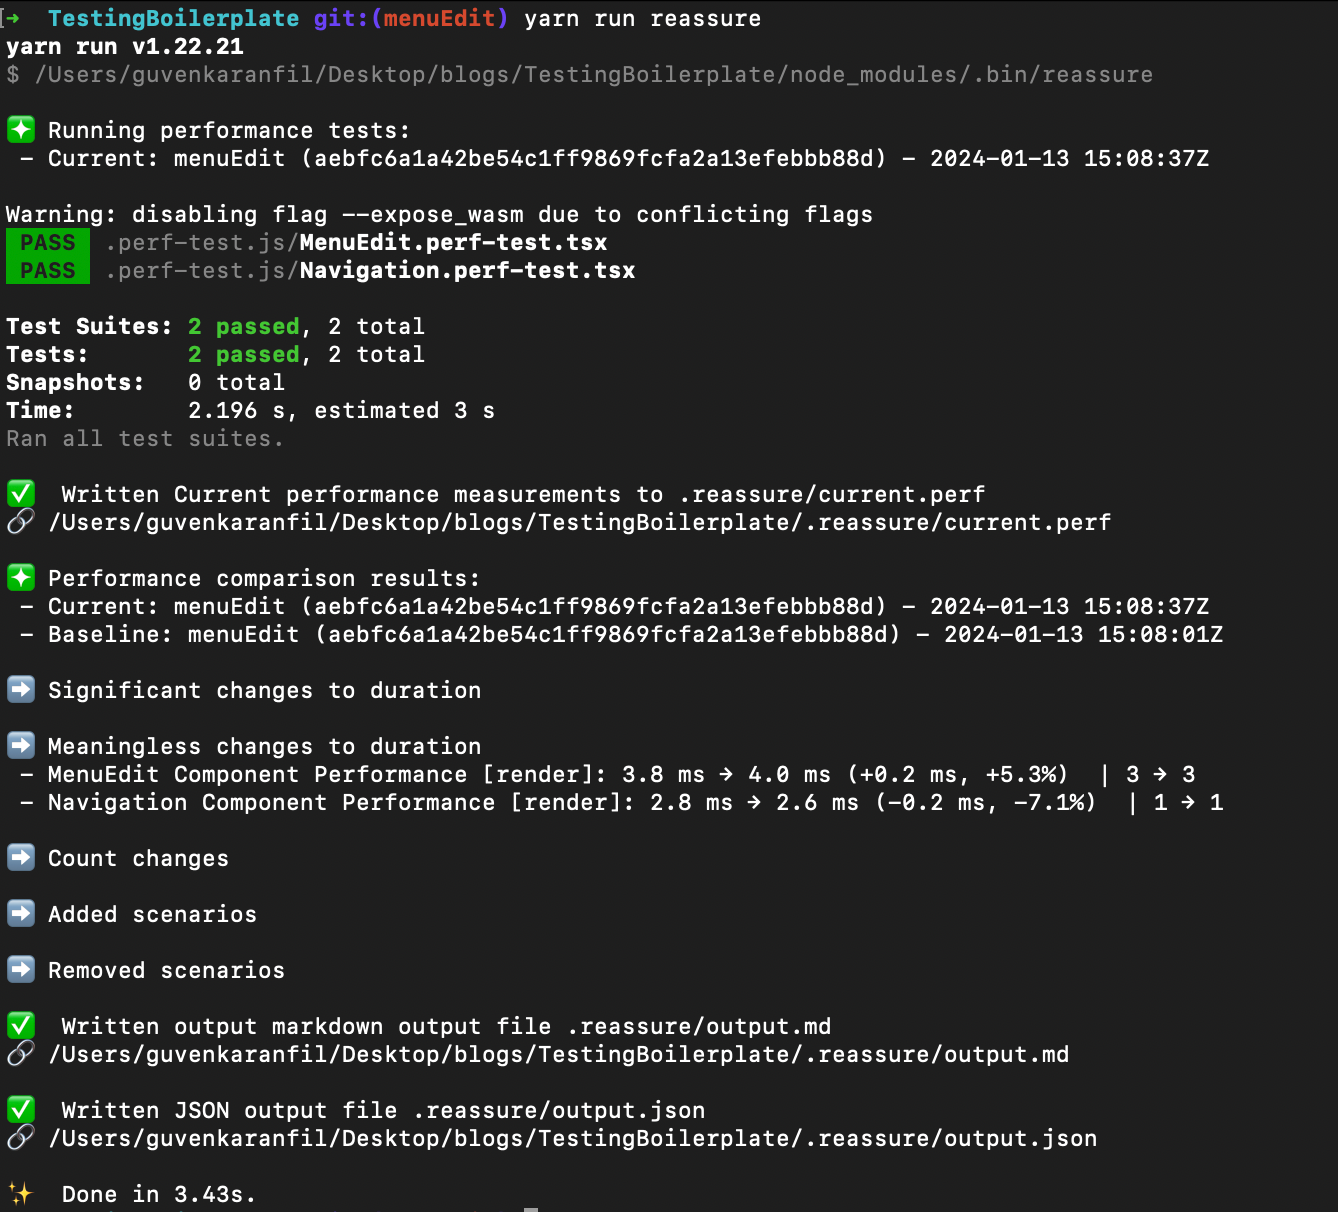 Reassure run result
reassure provides the result under titles like **“Meaningless changes to duration”. **The result shows rendering time in mili seconds and rendered count. For example, MenuEdit test took 4.0ms and render count is 3.
Let’s put some unncessary updates in MenuEdit.tsx component and observe performance changes.
      const [mock, setmock] = useState('');

      useEffect(() => {
        dispatch(setMenus(sortedMenus));
        setmock('Mock');
      }, [dispatch, sortedMenus]);
We just created a state called mock and update the value after we dispatch the menu items. Let’s run the test again and observe is there any changes.
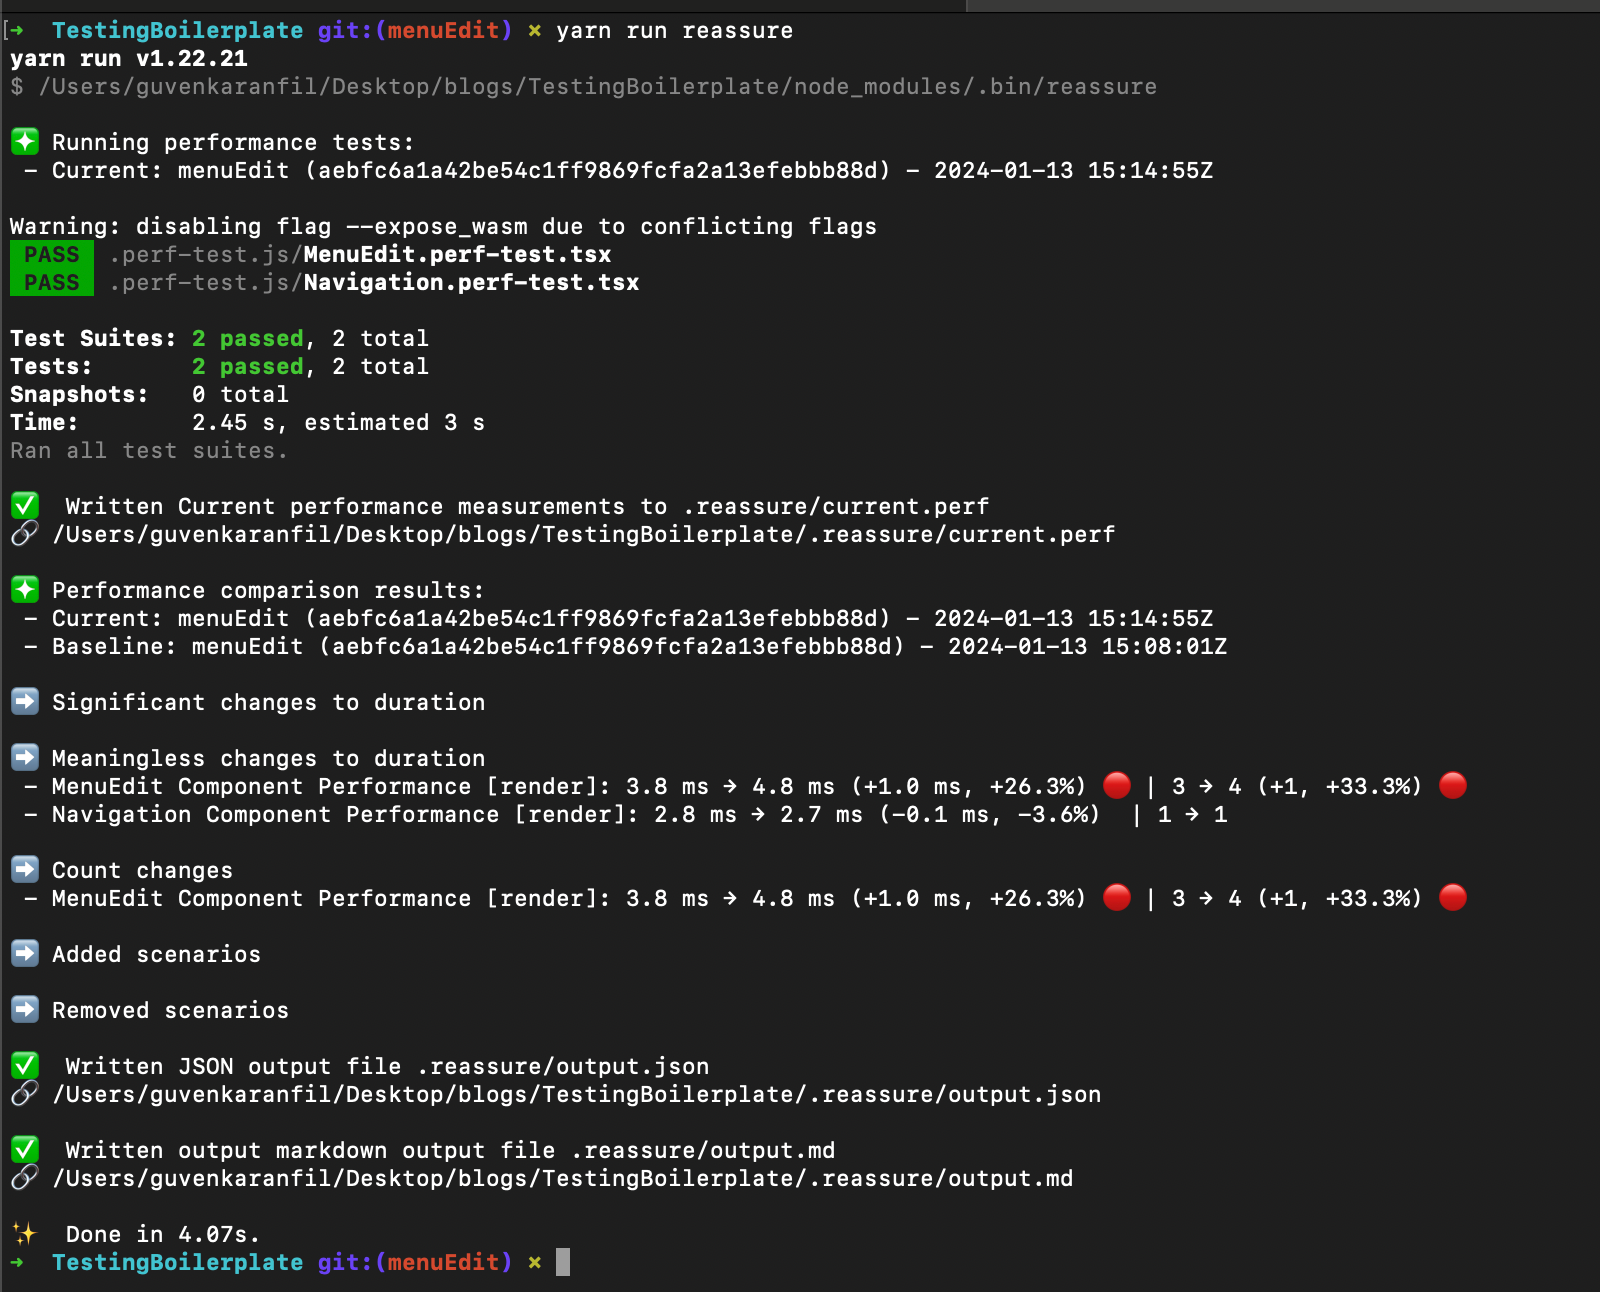
As the results indicate, the rendering time has increased to 4.8ms and the render count has risen to 4. Reassure provides quick feedback on how a component’s performance has changed. In some cases, these changes might be necessary due to the specific requirements of the task, and you might be satisfied with these modifications. In this case, just run the reassure with **— baseline **flag to update the baseline data. This way reassure will compare now the latest changes on the performance result.
If you are interested about reassure you can check out the podcast they did with the authors of the library here.
References:
ChatGPT
Podcast about reassure — https://www.youtube.com/watch?v=8pTQKBHFs-8&t=2112s
Reassure offical documentation — https://callstack.github.io/reassure/